
Here we will start with a new NextJS project. Create your NextJS project and open the folder in Visual Studio code.
The NextJS project gets created with some template code. Let’s delete them to start with a clean code. Delete the following files:
- src/styles/globals.css
- src/styles/Home.module.css
- src/pages/api/hello.js
- public/next.svg
- public/vercel.svg
Next, delete the code of index.js file ( located at src/pages/index.js ) so that it is a blank file. Obviously, we will write our own code here.
Next, go to file “src/pages/_app.js” and comment the first line import “@/styles/global.css”;
Now we have a clean NextJS project. From here the fun part starts. We will use Perplexity.ai to create multiple pages in this project.
Use Perplexity to design web page for your NextJS project
We will use Perplexity to design our web page. We will start with the design of Home page. An easy way to design web page is to design it with ASCII diagrams.
Prompt to create a wireframe design
I am in the process of creating a web app using Next.js. Create a wireframe design for the home page for the web app called “AI courses” that sells AI courses. Design the page layout with components using Ascii art for the wireframe.
The above prompt will generate a wireframe similar to below
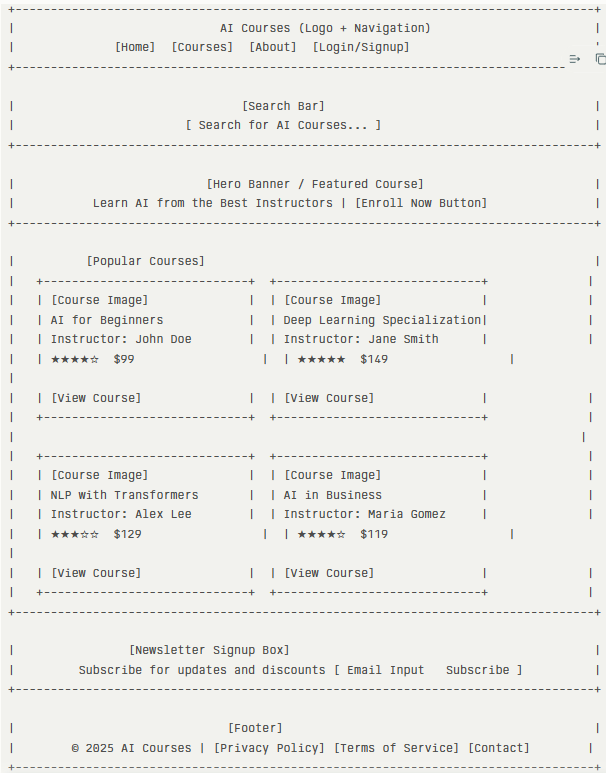
It even gives us below information: Here is a wireframe design in ASCII art for the home page of “AI courses” web app, structured for clarity and usability. The layout includes essential components like header, search, featured course, course listings, and footer, aligning with a typical Next.js web app structure for selling courses.
Layout Components Overview
- Header: Contains logo, navigation links, and authentication actions.
- Search Bar: Central input for finding AI courses.
- Hero Banner: Features main call-to-action and introductory text.
- Popular Courses: Grid of course cards with image, title, instructor, rating, price, and view button.
- Newsletter Signup: Simple box for newsletter subscriptions.
- Footer: Links for legal info and contact details.
This wireframe provides a clean structure for a Next.js app homepage focused on selling AI courses.
That is cool! It has done a lot of heavy work in seconds.
Generate HTML and CSS for Next.JS project
Let’s use Perplexity to generate HTML and CSS code for the above template design.
Prompt to Generate HTML and CSS for Next.js project
Write the page with layout corresponding to the design above. The content will be added by me later. Output any CSS styles using the styled-jsx tag. Output all the code as a single file.
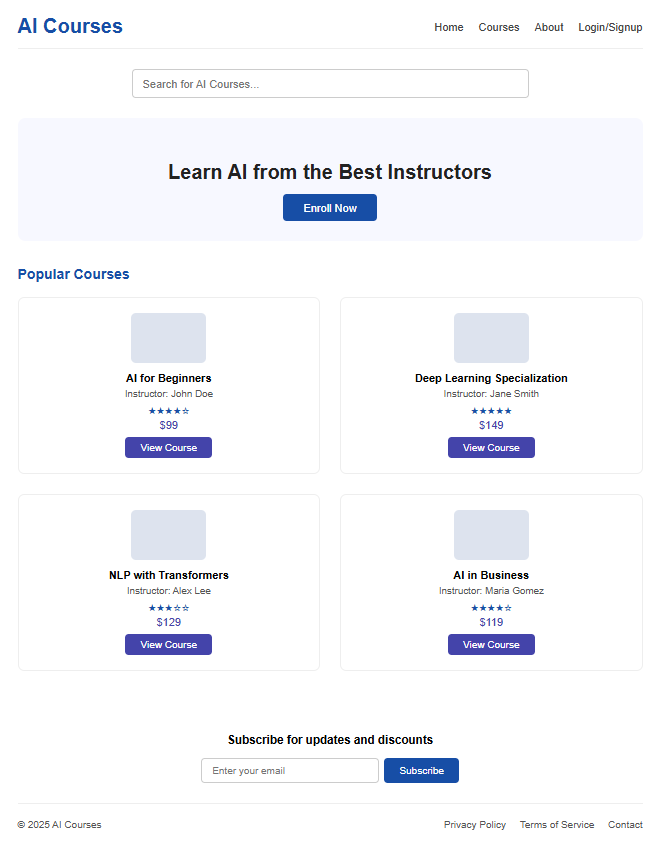
Paste the generated code in src/pages/index.js file. Below is the code generated by Perplexity.
import React from "react";

export default function HomePage() {
  return (
    <div className="container">
      {/* Header */}
      <header className="header">
        <div className="logo">AI Courses</div>
        <nav className="nav">
          <a href="#">Home</a>
          <a href="#">Courses</a>
          <a href="#">About</a>
          <a href="#">Login/Signup</a>
        </nav>
      </header>

      {/* Search Bar */}
      <section className="search">
        <input
          type="text"
          placeholder="Search for AI Courses..."
          className="search-input"
        />
      </section>

      {/* Hero Banner / Featured Course */}
      <section className="hero">
        <h1>Learn AI from the Best Instructors</h1>
        <button className="enroll-btn">Enroll Now</button>
      </section>

      {/* Popular Courses Grid */}
      <section className="courses">
        <h2>Popular Courses</h2>
        <div className="course-grid">
          <div className="course-card">
            <div className="course-image"></div>
            <div className="course-title">AI for Beginners</div>
            <div className="course-instructor">Instructor: John Doe</div>
            <div className="course-rating">★★★★☆</div>
            <div className="course-price">$99</div>
            <button className="view-btn">View Course</button>
          </div>
          <div className="course-card">
            <div className="course-image"></div>
            <div className="course-title">Deep Learning Specialization</div>
            <div className="course-instructor">Instructor: Jane Smith</div>
            <div className="course-rating">★★★★★</div>
            <div className="course-price">$149</div>
            <button className="view-btn">View Course</button>
          </div>
          <div className="course-card">
            <div className="course-image"></div>
            <div className="course-title">NLP with Transformers</div>
            <div className="course-instructor">Instructor: Alex Lee</div>
            <div className="course-rating">★★★☆☆</div>
            <div className="course-price">$129</div>
            <button className="view-btn">View Course</button>
          </div>
          <div className="course-card">
            <div className="course-image"></div>
            <div className="course-title">AI in Business</div>
            <div className="course-instructor">Instructor: Maria Gomez</div>
            <div className="course-rating">★★★★☆</div>
            <div className="course-price">$119</div>
            <button className="view-btn">View Course</button>
          </div>
        </div>
      </section>

      {/* Newsletter Signup */}
      <section className="newsletter">
        <h3>Subscribe for updates and discounts</h3>
        <div className="signup-box">
          <input
            type="email"
            placeholder="Enter your email"
            className="newsletter-input"
          />
          <button className="subscribe-btn">Subscribe</button>
        </div>
      </section>

      {/* Footer */}
      <footer className="footer">
        <span>© 2025 AI Courses</span>
        <div className="footer-links">
          <a href="#">Privacy Policy</a>
          <a href="#">Terms of Service</a>
          <a href="#">Contact</a>
        </div>
      </footer>

      {/* Styled JSX */}
      <style jsx>{`
        .container {
          font-family: Arial, sans-serif;
          margin: 0 auto;
          max-width: 1000px;
        }
        .header {
          display: flex;
          justify-content: space-between;
          align-items: center;
          padding: 32px 0 16px 0;
          border-bottom: 1px solid #eee;
        }
        .logo {
          font-weight: bold;
          font-size: 2rem;
          color: #174ea6;
        }
        .nav a {
          margin-left: 24px;
          text-decoration: none;
          color: #444;
          font-size: 1.1rem;
        }
        .nav a:hover {
          color: #174ea6;
        }
        .search {
          display: flex;
          justify-content: center;
          margin: 32px 0;
        }
        .search-input {
          width: 60%;
          padding: 12px 16px;
          font-size: 1.1rem;
          border: 1px solid #ccc;
          border-radius: 6px;
        }
        .hero {
          text-align: center;
          padding: 48px 0 32px 0;
          background: #f7f8ff;
          border-radius: 12px;
          margin-bottom: 40px;
        }
        .hero h1 {
          font-size: 2rem;
          margin-bottom: 16px;
          color: #222;
        }
        .enroll-btn {
          padding: 12px 32px;
          font-size: 1.1rem;
          background: #174ea6;
          color: #fff;
          border: none;
          border-radius: 6px;
          cursor: pointer;
          transition: background 0.2s;
        }
        .enroll-btn:hover {
          background: #283593;
        }
        .courses {
          margin-bottom: 48px;
        }
        .courses h2 {
          font-size: 1.4rem;
          margin-bottom: 24px;
          color: #174ea6;
        }
        .course-grid {
          display: grid;
          grid-template-columns: 1fr 1fr;
          gap: 32px;
        }
        .course-card {
          background: #fff;
          border: 1px solid #eee;
          border-radius: 10px;
          padding: 24px;
          display: flex;
          flex-direction: column;
          align-items: center;
        }
        .course-image {
          width: 120px;
          height: 80px;
          background: #dde3ee;
          border-radius: 8px;
          margin-bottom: 14px;
        }
        .course-title {
          font-weight: bold;
          font-size: 1.1rem;
          margin-bottom: 6px;
        }
        .course-instructor {
          font-size: 0.98rem;
          margin-bottom: 6px;
          color: #555;
        }
        .course-rating {
          font-size: 1rem;
          margin-bottom: 4px;
          color: #174ea6;
        }
        .course-price {
          font-size: 1.1rem;
          margin-bottom: 10px;
          color: #44a;
        }
        .view-btn {
          padding: 8px 24px;
          background: #44a;
          color: #fff;
          border: none;
          border-radius: 6px;
          cursor: pointer;
          font-size: 1rem;
          transition: background 0.2s;
        }
        .view-btn:hover {
          background: #174ea6;
        }
        .newsletter {
          padding: 32px 0;
          text-align: center;
        }
        .newsletter-input {
          padding: 10px 16px;
          border: 1px solid #ccc;
          border-radius: 6px;
          font-size: 1rem;
          width: 250px;
        }
        .signup-box {
          display: flex;
          justify-content: center;
          margin-top: 10px;
        }
        .subscribe-btn {
          margin-left: 8px;
          padding: 10px 24px;
          background: #174ea6;
          color: #fff;
          border: none;
          border-radius: 6px;
          font-size: 1rem;
          cursor: pointer;
        }
        .subscribe-btn:hover {
          background: #283593;
        }
        .footer {
          padding: 24px 0 12px 0;
          border-top: 1px solid #eee;
          text-align: center;
          font-size: 1rem;
          color: #555;
          display: flex;
          justify-content: space-between;
          align-items: center;
        }
        .footer-links a {
          margin-left: 22px;
          color: #555;
          text-decoration: none;
        }
        .footer-links a:hover {
          color: #174ea6;
        }
        @media (max-width: 700px) {
          .course-grid {
            grid-template-columns: 1fr;
          }
          .header, .footer {
            flex-direction: column;
            align-items: flex-start;
          }
        }
      `}</style>
    </div>
  );
}
And the page looks like this.
Generate image using Gen AI
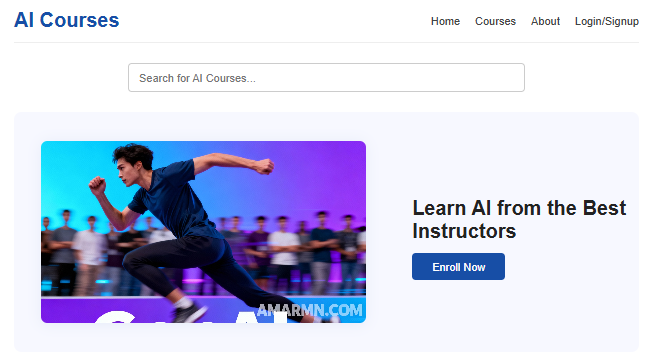
Next, let’s generate an image for the Hero banner. I am using Perplexity Pro and it can easily generate an image for me. Here goes the prompt.
Generate an image for the Hero banner, wide aspect ratio, show that with the help of GenAI you can be much better than the majority. Add AMARMN.COM as watermark.
It generated an image like this.

But it has placed unnecessary text and added tabs on the page which is not required. So I tried regenerating it. This step took a lot of my time. I had to try regenerating the image multiple times and still I could not achieve the desired result. I used DALL – E 3 model. Finally, I took one of the generated image, cropped it and used it for the banner.
Make sure you place the image at the path src/public/images/<name of the image>.<filetype>
Next change the code to add banner image.
      {/* Hero Banner / Featured Course */}
      <section className="hero">
        <div className="hero-image">
          {/* Replace src with the actual image you want to use */}
          <img
            src="/images/hero_banner_ai_courses.png"
            alt="AI Courses Hero Banner"
            className="hero-img"
          />
        </div>
        <div className="hero-content">
          <h1>Learn AI from the Best Instructors</h1>
          <button className="enroll-btn">Enroll Now</button>
        </div>
      </section>
Also delete the .hero and .hero h1 section from css part and place below code at its place.
.hero {
          display: flex;
          align-items: center;
          justify-content: space-between;
          background: #f7f8ff;
          border-radius: 12px;
          margin-bottom: 40px;
          padding: 32px 0 32px 0;
          min-height: 320px;
          gap: 32px;
        }
        .hero-image {
          flex: 2;
          display: flex;
          align-items: center;
          justify-content: center;
        }
        .hero-img {
          width: 100%;
          max-width: 520px;
          border-radius: 10px;
          object-fit: cover;
          aspect-ratio: 16 / 9;
          box-shadow: 0 2px 24px rgba(23, 78, 166, 0.08);
        }
        .hero-content {
          flex: 1.2;
          text-align: left;
        }
        .hero-content h1 {
          font-size: 2rem;
          margin-bottom: 16px;
          color: #222;
        }
Yes all the above code is generated by Perplexity and it worked like a charm. Below is the output.
Overall, the joy of making AI write the code is amazing. You should have an understanding of the code and let the AI take the writing work. You take up the approval work.