In this example we create a SplitApp application from scratch. We will use sap.m.SplitApp control to create a master-detail application. SplitApp is a root element control.
SplitApp will have two NavContainers . The left hand side normally holds the master page and the right hand side holds the detail page.
In this SplitApp application we have a list in the master page. The list will be clickable and based on the selection, the detail view will be called.
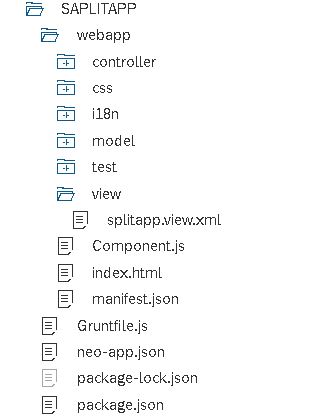
Create a SAPUI5 application using the Project From Template wizard. Provide a relevant Project Name and Namespace. I have named the project as SPLITAPP and namespace as Amarmn. The View Type is XML and View name I have kept as splitapp. Click Finish, and below is the project structure that will be created.
The above is a simple SAPUI5 application. I have named the view as splitapp because I am going to place the SplitApp control inside it. Change the code of splitapp view by using the below code snippet.
<Shell id="shell">
	<SplitApp id="splitapp"></SplitApp>
</Shell>
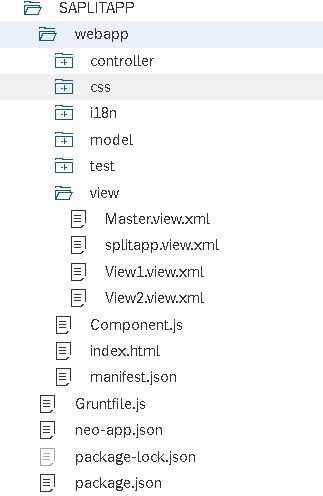
Next, we are going to create 3 more views. One Master view and two detail views with name View1 and View2. Right-click on view folder select New->SAPUI5 View. Create 3 XML views with name Master, View1 and View2. Remember that if you create the views with the above process, it will also create the controllers. Now your application structure will be similar to below image.
In the Master view, delete the App control and place the below code snippet.
<Page title="Master Page">
<content>
<List headerText="">
	<items>
	<StandardListItem title="View1" press=".onView1" type="Navigation"/>
	<StandardListItem title="View2" press=".onView2" type="Navigation"/>
	</items>
</List>
</content>
</Page>
In the View1 view, delete the App control and place the below code snippet.
<Page title="View 1">
<content>
	<Text text="View 1"></Text>
</content>
</Page>
I have kept the code logic simple to focus more on the concept. In the above code, we have just place a Text control inside the view. Write a similar piece of code for View2 view.
SAPUI5 SplitApp routing configuration in manifest.json file
This is the most important step in creating a SplitApp application.
Step1: check “rootview” section
Open the manifest.json file and check the “rootview” configuration. It should be something like below code snippet.
"rootView": {
	"viewName": "Amarmn.SAPLITAPP.view.splitapp",
	"type": "XML",
	"async": true,
	"id": "splitapp"
},
So my rootView is the splitapp view. Notice that id of SplitApp control is also mentioned in the above code snippet.
step 2: check “config” section
Look for config section and make it like below code snippet. Notice that “controlId” is “splitapp”. Also, “controlAggregation”: “pages” is deleted as in our case we are not using this aggregation.
"config": {
	"routerClass": "sap.m.routing.Router",
	"viewType": "XML",
	"async": true,
	"viewPath": "Amarmn.SAPLITAPP.view",
	"controlId": "splitapp",
	"clearControlAggregation": false
}
step 3: check “routes” and “targets” section
Look for “routes” and “targets”section. Delete the code and at its place put the below code snippet. Check the code snippet carefully.
- The “name ” attribute holds the route name. I have kept different name for the different routes for clarity. Later you will find that the value of “name ” attribute helps us in navigation.
- The name of “targets” is different from the view name. Don’t think that the targets name should be same as the view name.
- Each target targets a view. Notice that “controlAggregation” parameter is added to the view. With “controlAggreagation” we indicate which view is the master view and which view is the detail view.
"routes": [{
	"pattern": "",
	"name": "route",
	"target": ["master", "view1"]
}, {
	"pattern": "navView1",
	"name": "route1",
	"target": ["master", "view1"]
}, {
	"pattern": "navView2",
	"name": "route2",
	"target": ["master", "view2"]
}],
"targets": {
	"master": {
		"viewType": "XML",
		"viewName": "Master",
		"controlAggregation": "masterPages"
	},
	"view1": {
		"viewType": "XML",
		"viewName": "View1",
		"controlAggregation": "detailPages"
	},
	"view2": {
		"viewType": "XML",
		"viewName": "View2",
		"controlAggregation": "detailPages"
	}
}
The above were most important changes in manifest.json file.
The only piece of code that is left is to write the functions ‘onView1’ and ‘onView2’ in the Master.controller.js file.
SAPUI5 SplitApp navigation code in Master.controller.js file
On the press of the list in the master view, we should call the appropriate detail view. For this we have already mentioned the event handler functions when completing Master.view.xml code. Now, we be completing the event handler function in its controller file. Place the below code snippet in Master.controller.js file.
sap.ui.define([
	"sap/ui/core/mvc/Controller",
	"sap/ui/core/UIComponent"
], function (Controller, UIComponent) {
	"use strict";

	return Controller.extend("Amarmn.SAPLITAPP.controller.Master", {

		onInit: function () {

		},
		onView1: function () {
			var oRouter = UIComponent.getRouterFor(this);
			oRouter.navTo("route1", false);
		},
		onView2: function () {
			var oRouter = UIComponent.getRouterFor(this);
			oRouter.navTo("route2", false);
		}

	});

});
Notice that the oRouter object used the “routes” name for navigation.
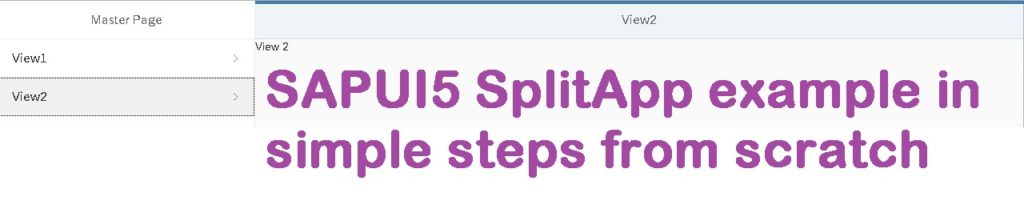
With this we complete the code part and now its time to test the application. Run the application to see the below output.

Press View2 in left-hand side.

Conclusion
We created a simple SAPUI5 SplitApp example. We also learned the important confiugartion that should be done in manifest.json file. This example also covered SAPUI5 SplitApp navigation.