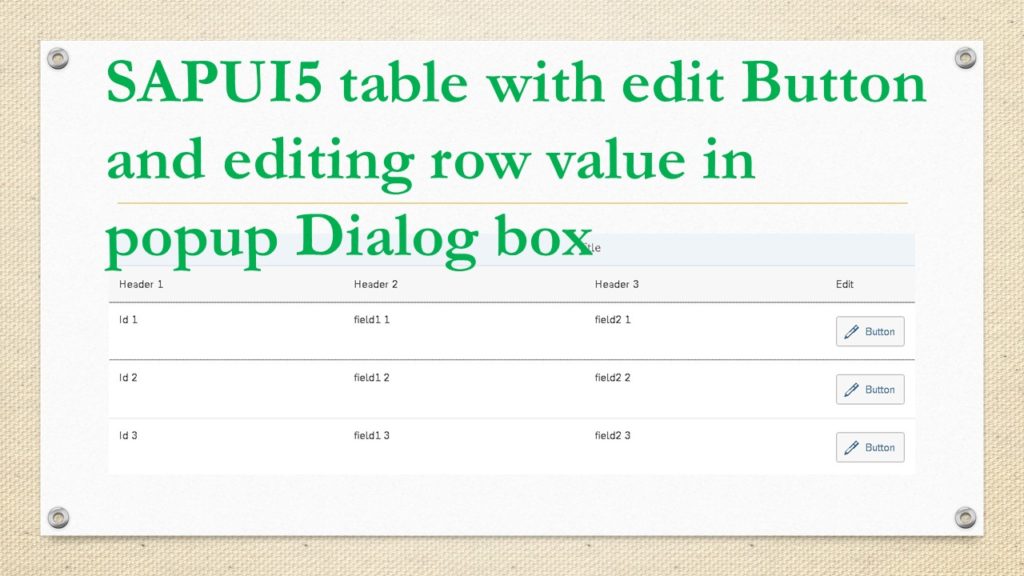
In this example, I create a SAPUI5 table. One of the column of table will have a button with edit icon. On click of the edit button, a dialog box should open along with the data of the clicked row.
The dialog box will have input control, and user should be able to change the data as per their requirement. Dialog box will have two buttons, Update and Cancel. On click of Update button, the dialog box should close and the concerned row of the table should display the new value entered by the user in the dialog box. If the user clicks on Cancel button, the value entered by user should not reflect in the row concerned and it should display the previous value. Finally, below the table, we should have a Save button. On click of Save button, the whole data of the table should be send to the backend via an OData service.
Create a new SAPUI5 Application using SAPWeb IDE Project from Template wizard.
I have given Project Name as SAPUI5TABLE and Namespace as AMARMN. I left the View type as XML and View Name as View1.
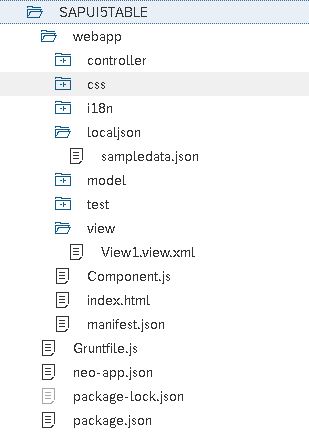
Create a new folder localjson inside webapp folder. Inside localjson folder create file sampledata.json. I created this file to hold the json data separately. Your folder structure will look something like below.
Create JSON file SAPUI5 define json model in manifest
Inside sampledata.json file place the below data. Its just some raw data to create a table list.
{
"tablelist" :	[{
		"Id": "Id 1",
		"field1": "field1 1",
		"field2": "field2 1"
	}, {
		"Id": "Id 2",
		"field1": "field1 2",
		"field2": "field2 2"
	}, {
		"Id": "Id 3",
		"field1": "field1 3",
		"field2": "field2 3"
	}, {
		"Id": "Id 4",
		"field1": "field1 4",
		"field2": "field2 4"
	}, {
		"Id": "Id 5",
		"field1": "field1 5",
		"field2": "field2 5"
	}, {
		"Id": "Id 6",
		"field1": "field1 6",
		"field2": "field2 6"
	}, {
		"Id": "Id 7",
		"field1": "field1 7",
		"field2": "field2 7"
	}, {
		"Id": "Id 8",
		"field1": "field1 8",
		"field2": "field2 8"
	}, {
		"Id": "Id 9",
		"field1": "field1 9",
		"field2": "field2 9"
	}, {
		"Id": "Id 10",
		"field1": "field1 10",
		"field2": "field2 10"
	}]
}
Now, that we have the data, we need to instantiate a json model with this data.
Open manifest.json file and switch to Descriptor editor mode. Go to Models tab, and click + icon for Add Model Source. Fill in the details as shown in image below and click OK.
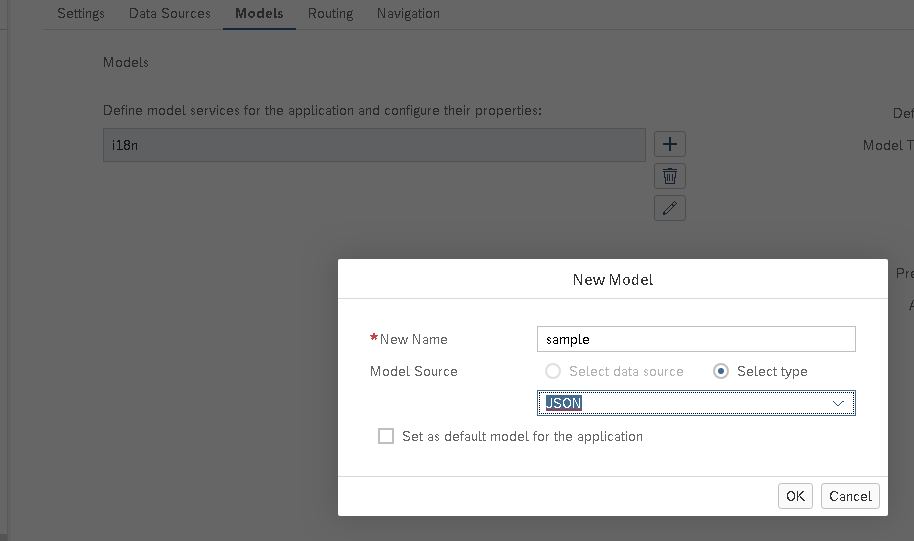
Here we created a named JSON model, with name “sample”. In the URI field provide path of json file. In my case, it will be localjson/sampledata.json. Save your manifest.json file.
Now the named json model is ready to be used throughout the application.
SAPI5 bind JSON model to table
Next, open XML view in Layout editor, drag and drop Table control on to the page. WebIDE does the work and writes the table code for us.
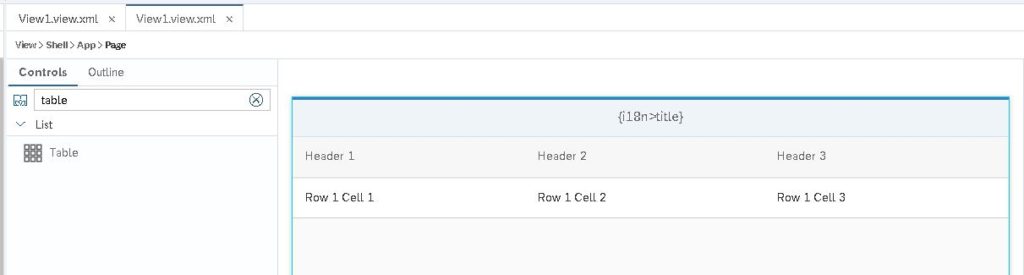
We will do some changes to the code created by WebIDE. I add a 4th column with label Edit. I add button control for the 4th column. To this button I have added edit icon and function for press event. Remember that our requirement is to open a dialog box when the button is pressed. Inside this dialog box, we should be able to change the row data.
Use the XML view layout editor to add function to the press event of the button. I like the layout editor as it really simplifies SAPUI5 coding. If you create the event handler function using the layout editor it will automatically create the function in the controller.js file. Hence it is quick and less error prone.
In the layout editor, select button, in RHS switch to events tab. For press, click the 3 dots and select New Function.
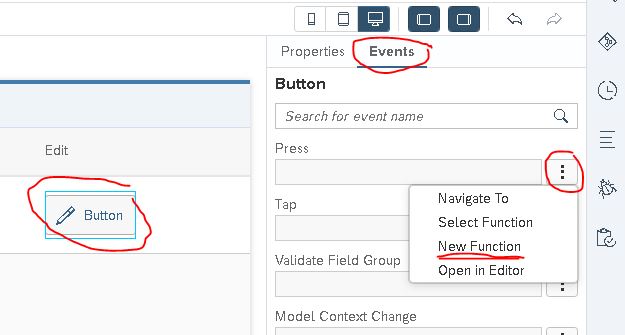
Enter onbuttonpress in the Name field and hit Create button. It will automatically create function with same name in the controller.js file.
Complete the table binding and the table items binding. The code for table will now look something like below.
<Table noDataText="No data to display"
            items="{sample>/tablelist}" id="table0">
<items>
        <ColumnListItem type="Active" id="item0">
	<cells>
	<Text text="{sample>Id}" id="text0"/>
	<Text text="{sample>field1}" id="text1"/>
	<Text text="{sample>field2}" id="text2"/>
	<Button xmlns="sap.m" text="Button"
                   id="button0"
                 icon="sap-icon://edit"
                press="onbuttonpress"/>
         </cells>
	</ColumnListItem>
</items>
<columns>
	<Column id="column0">
	<header>
	<Label text="Header 1" id="label0"/>
	</header>
	</Column>
	<Column id="column1">
	<header>
	<Label text="Header 2" id="label1"/>
	</header>
	</Column>
	<Column id="column2">
	<header>
	<Label text="Header 3" id="label2"/>
	</header>
	</Column>
	<Column id="column3">
	<header>
	<Label text="Edit" id="label3"/>
	</header>
	</Column>
</columns>
</Table>
Run the application and see the table displayed along with button.
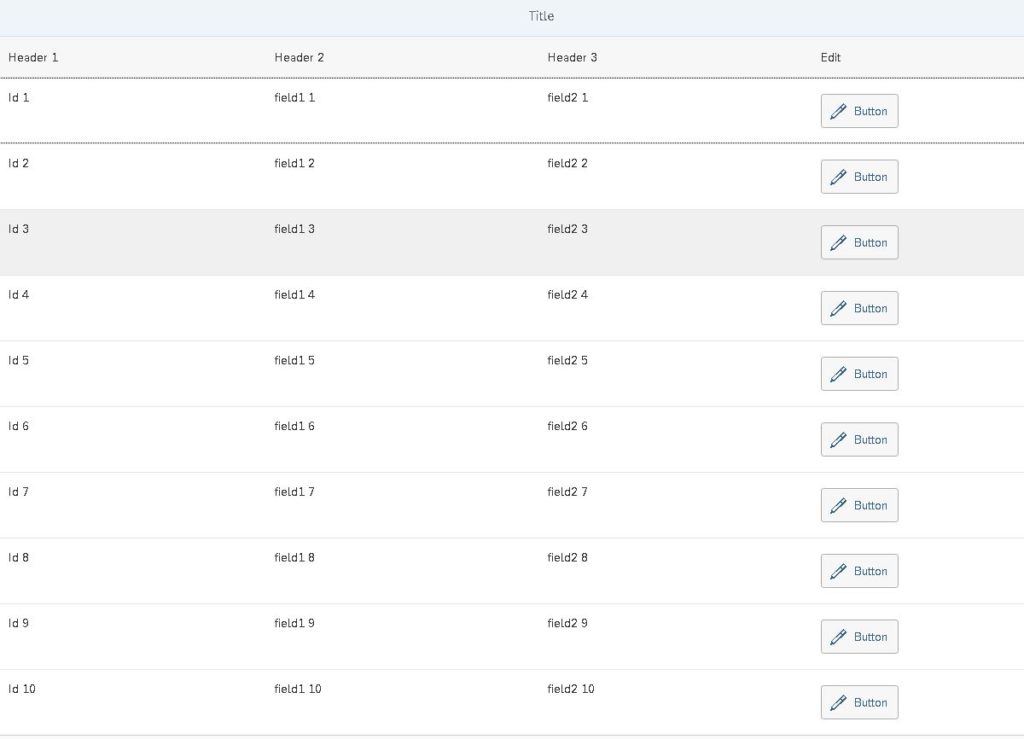
This far, all good.
Next, we should create a fragment that will hold the dialog box code.
SAPUI5 fragment in XML view
Inside view folder, I create a fragment with name inputdialog.fragment.xml. Inside this fragment I will place code for the dialog box. If you don’t have much information about fragments and dialog box, please refer my article SAPUI5 Fragments Example – Part 5 – sapui5 tutorial for beginners to know more about it.
<core:FragmentDefinition
xmlns="sap.m"
xmlns:f="sap.ui.layout.form"
xmlns:l="sap.ui.layout"
xmlns:core="sap.ui.core"
id="inputdialog">
	<Dialog id="openDialog" title="Dialog box">
	<VBox class="sapUiSmallMargin">
	<f:SimpleForm
         id="SimpleFormDisplay354"
         editable="true"
         layout="ResponsiveGridLayout"
         title="Change the data"
         labelSpanXL="3"
	 labelSpanL="3"
         labelSpanM="3"
         labelSpanS="12"
         adjustLabelSpan="false"
         emptySpanXL="4"
         emptySpanL="4"
         emptySpanM="4"
         emptySpanS="0"
	 columnsXL="1"
         columnsL="1"
         columnsM="1"
         singleContainerFullSize="false">
	<f:content>
	<Label text="Header1"/>
	<Text id="Id" text="{sample>Id}"/>
	<Label text="Header2"/>
	<Input id="field1" value="{sample>field1}" />
	<Label text="Header3"/>
	<Input id="field2" value="{sample>field2}"/>
	</f:content>
	</f:SimpleForm>
	</VBox>
<buttons>
	<Button text="Update" press=".updateDialog"/>
	<Button text="Cancel" press=".closeDialog"/>
</buttons>
</Dialog>
</core:FragmentDefinition>
In the fragment code, I have placed a SimpleForm. The SimpleForm holds a Text and 2 Input fields. I don’t want to change the Id, hence have used a text field for the Id. For the other two columns , input field will be used. Below the form are placed two button, one for Update and another for Cancel. Next, will have to write code for onbuttonpress function, so that on click of edit button the dialog box opens. The function code needs to be written in Controller.js file.
SAPUI5 bind element to popup dialog/fragment
The below piece of code needs to be written in the controller.js file. There are two functions: onbuttonpress and closeDialog. We need to apply bindElement to popup dialog box so that data flows from the model to the child controls of the Dialog box.
sap.ui.define(["sap/ui/core/mvc/Controller",
               "sap/ui/core/Fragment"],
function (Controller, Fragment) {
"use strict";
return Controller.extend("AMARMN.SAPUI5TABLE.controller.View1", {
onInit: function () {},
/**
*@memberOf AMARMN.SAPUI5TABLE.controller.View1
*/
onbuttonpress: function (oEvent) {
var oView = this.getView();
var path = oEvent.getSource().getBindingContext("sample").getPath();
// create dialog lazily
if (!this.byId("openDialog")) {
// load asynchronous XML fragment
Fragment.load({
	id: oView.getId(),
	name: "AMARMN.SAPUI5TABLE.view.inputdialog",
	controller: this
	}).then(function (oDialog) {
// connect dialog to the root view
//of this component (models, lifecycle)
oView.addDependent(oDialog);
oDialog.bindElement({
	path: path,
	model: "sample"
	});
oDialog.open();
});
}
},

closeDialog: function () {
this.byId("openDialog").destroy();
}
});
});
A lot is happening in the above piece of code. Most important stuff goes on in the onbuttonpress function. Notice how we have loaded the Fragment along with the Dialog box. Next, we do Element binding with the dialog box. I have got the path using getBindingContext method. Element binding with correct path ensures a correct flow of data from the model to the child controls of Dialog box.
The code for closeDialog box is also written. Here I had to destroy the Dialog box so that every time a button in table row is pressed, it should open a dialog box with the data of that row.
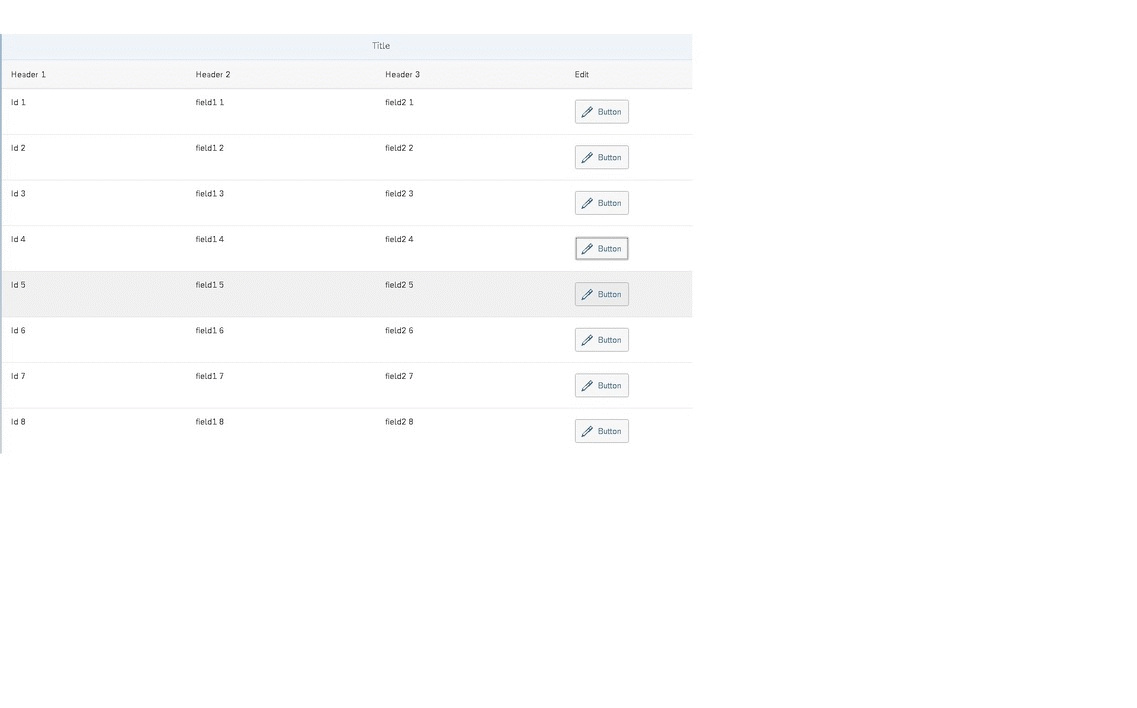
SAPUI5 table application output
Test your application and it should be working.
Remember, that JSON model is by default two-way binding. So, as soon as you do changes in the dialog box input field, the data flows to the JSON Model and even updates the concerned table row. Hence, the update button plays no role over here. Even the cancel button does not do much other that just destroying the dialog box. In all cases, as you as you make changes in the input field, the data flows to the table row and updates there. If you want the data to be updated only on click of Update button, then you will have to restrict JSON model to one-way binding using a code similar to below.
oModel.setDefaultBindingMode(sap.ui.model.BindingMode.OneWay);
I am not covering this part, as I am sure you should be able to figure out how to proceed from here. If not check out a similar example of binding sap.m.table with Odata model.
Conclusion
This sapui5 table example explains various concepts such as sapui5 binding table with json model, how to fetch the data of selected row of the table, fragments and dialog box in sapui5.